Kevin's Woodturnings

TIPS and
TECHNIQUES
Click on the hyperlink below to jump to the section:
Dial Bevel
Protractors for Angle Measurement
Stone Chip Inlay
Technique
Triangle
Inserts in Segment Rings
Dial Bevel
Protractors for Angle Measurement
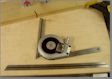
Over the years, I have purchased many
different types of protractors for measuring angles and have never been
very satisfied with any of them. Recently, I discovered dial
bevel protractors. They have been around for years but I didn't
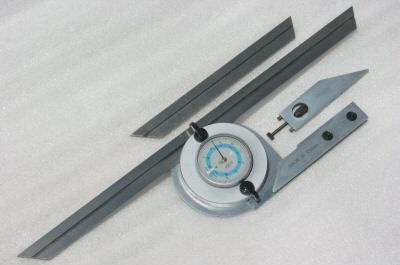
know it. I purchased four different types of dial bevel
protractors and found that these two types, pictured below, are the
easiest to use. They are both fairly inexpensive and VERY
accurate.
Both types of dial bevel protractors
pictured below are highly recommended. The other types (not
pictured) are not recommended because they were either too difficult
for most people to use (vernier scales) or were not properly calibrated
(angles were off). I purchased both of these dial bevel
protractors on eBay. Whatever you buy, you need
to test the bevel protractor calibration against a precision
square to make sure the bevel protractor reads 90
degrees with the square. Search eBay for "bevel
protractor" to find them.
Both dial bevel protractors show
angle degrees directly on the dial. For angles less than one
degree, both dial bevel protractors show angles in minutes of arc, so
you will need a calculator to help you set the dial bevel protractor to
the angle you want. All you have to do
to convert tenths of a degree to minutes is to multiply the tenths of a
degree by 60 to get minutes. For example, 0.8 degree x
60 = 48 minutes. My Table Saw Miter Angles program can be
easily configured to show calculated angles in degrees and minutes for
use with dial bevel protractors.
When measuring an angle with either dial
bevel protractor the angle will be read as degrees and minutes.
All you have to do to convert minutes to degrees is to divide the
minutes by 60 to get degrees. For example, 48 minutes / 60 =
0.8 degrees.
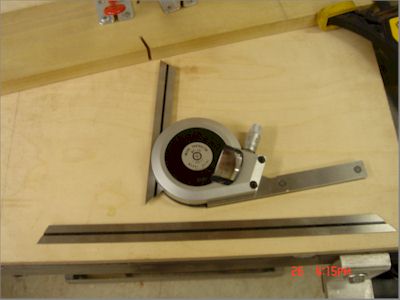
The long blades that come with both dial bevel
protractors are very handy to set miter gauges. The short blades
work very well to set sawblade angles.
Click on any photo to enlarge it.
 |
 |
-
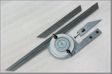
Universal Dial Bevel Protractor
-
Cost on eBay: about $25.00 new
-
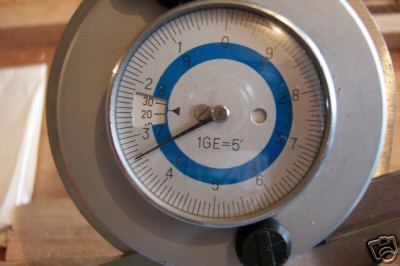
Accuracy: to 0.08 degrees (5 minutes of arc)
The small cutout at the center left of the
dial shows angles every 10 degrees. The main dial
needle goes around once every 10 degrees. The smallest
graduation on the main dial is 5 minutes of arc (0.08 degree).
One of the thumbscrews next to the dial locks the blade into
place. The other thumbscrew locks the angle setting.
I have heard that Grizzly sells these universal
bevel dial indicators for about $45. This one is plenty accurate
for setting saw compound miter angles.
|
 |
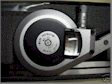 |
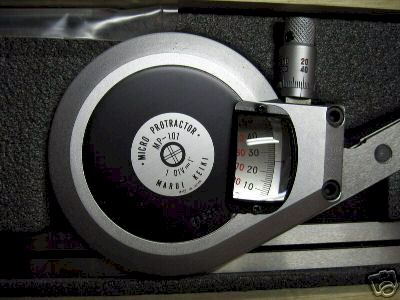
Marui Keiki MP-101 Dial Bevel Protractor (or
Micro Protractor)
Cost on eBay: about $85.00 to
$125.00 used condition
Accuracy: to 0.016 degrees (1 minute of arc)
The dial shows angles every 1 degree as read
through the magnifier. The micrometer-type knob goes around once
every 1 degree. The smallest graduation on the knob is 1
minute of arc (0.016 degree). A simple cam mechanism locks
the blade into place. There is no need for a separate angle
setting lock with this type of dial bevel protractor.
You will have a difficult time finding this
protractor on eBay or anywhere on the internet but if you want the best
and most accurate, this is the one to get.
|
Stone Chip Inlay Technique
A good source for
stone chips is Arizona
Silhouette.
1. The wood surrounding the groove can
be
protected from glue staining with sanding sealer or something similar.
2. The groove should be at minimum 1/16" deep. If the groove is
overly deep you can fill it partway with sawdust and glue.
3. Fill the groove with dry stone (no glue). Overfill the
groove a
little.
4. Drizzle water-thin superglue over the stone.
5. I usually use glue accelerator, but to avoid turning the glue
white, I
use a very fine mist of aerosol accelerator so the glue will harden
just enough
so the stone won't fall out.
6. Sand the stone mostly flat.
7. Fill any voids around the stone with medium-thickness
superglue.
8. Final sand and fill voids again with medium-thickness
superglue as necessary then
resand.
Tip: Don't use stone dust. It can
end up looking like paint
rather than stone chip inlay. Medium coarse stone is better than
fine stone
because it looks more natural. You might find jade is too
difficult to
sand. I wouldn't use any stone harder than lapis. Turquoise
and
malachite are relatively easy to sand.
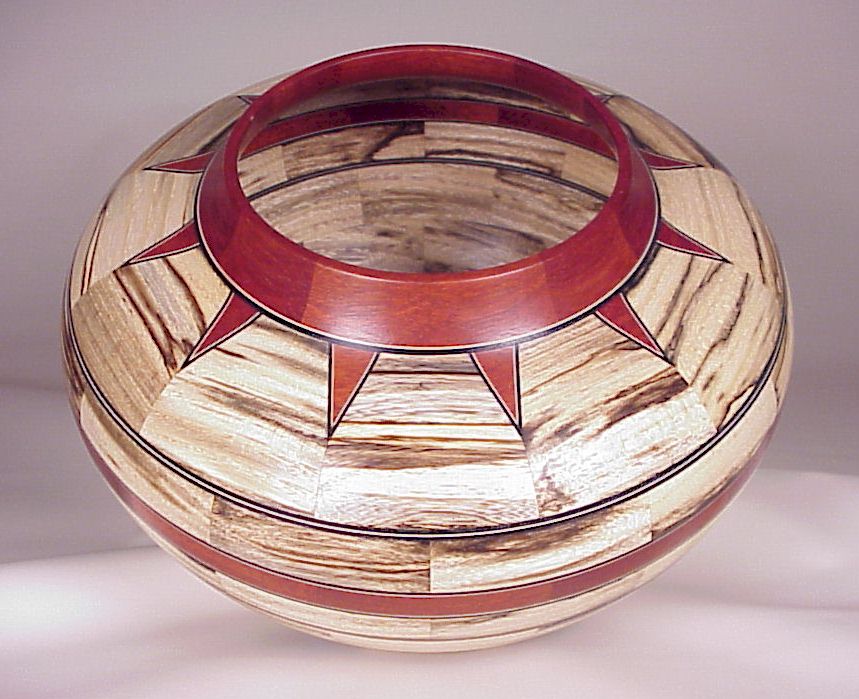
Triangle Inserts in Segment Rings
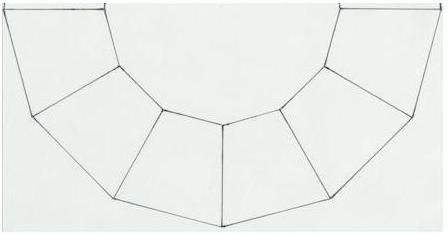 |
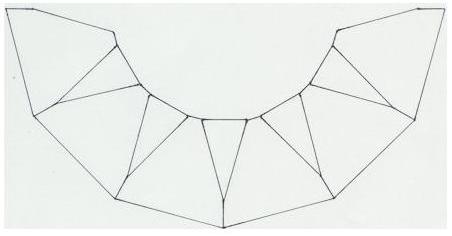
STEP 1. Cut the segments for your flat ring. Make
sure they make a reasonably good circle but don't glue anything
together yet. This example shows a 12-segment ring. The sled
fence was set at 15 degrees to cut the segments. |
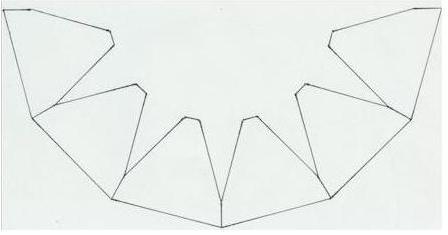 |
STEP 2. To insert triangles into the segment ring each
segment must be cut twice. Because part of the triangle will be
covered up by the lip ring (or the next ring) I chose to make the
height of each triangle about 75% of the board width I used to cut the
segments so there would be plenty visible triangle in the finished
bowl. Note that I left a small space between the triangle cutouts
so the base of the inserted triangles would not overlap. The
space dimension should be larger than zero.
I decided that this ring could best use triangles with angles
75-75-30 degrees. Triangles with any angles can be
used. You just need to know the angle. I suggest that you
draw the triangle on a pair of segments then measure the
triangle's vertex angle (30 degrees in this example).
|
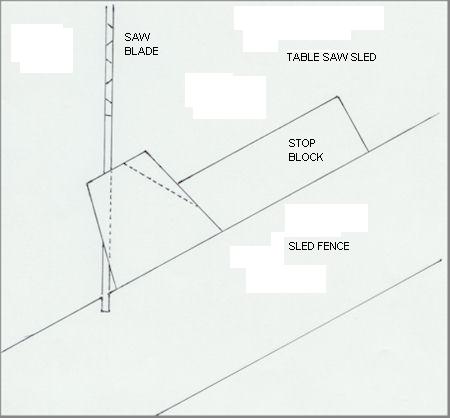 |
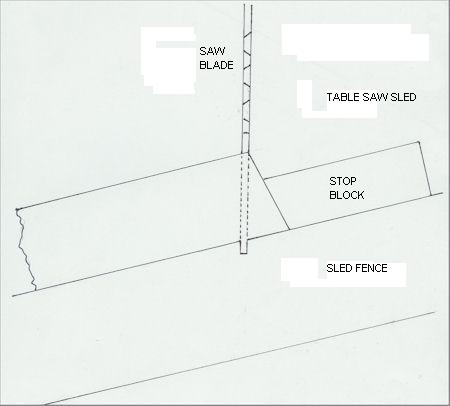
STEP2 CONTINUED. Cut the corners off the
segments. This is the table saw setup for cutting corners off the
segments. For safety, please use the appropriate clamps and
holddowns. The sled fence angle in this example was adjusted to
30 degrees, which is the segment miter angle (15 degrees) plus half the
triangle vertex angle (30/2= 15 degrees). Cut one side of the
segment then flip the segment and cut the other side. |
 |
STEP 3. First, rip a board to slightly larger width
than the height of your triangles. The triangles will be cut
sequentially from the board, in other words: cut, flip, cut, flip,
etc. |
 |
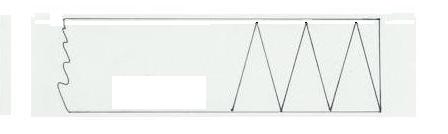
STEP 3 CONTINUED. Cut the triangles. The sled
fence in this example was adjusted to 15 degrees, which is half the
triangle vertex angle (30/2=15 degrees). For safety, please use
the appropriate clamps and holddowns. Cut the end of your
triangle board. Then set the stop block to the appropriate
distance so that the triangle will have a sharp point. Cut a
triangle then make sure the angle is correct by dry-fitting it into a
pair of segments. If OK then continue cutting the triangles.
Veneer can be glued to the triangle sides to further define
the triangles from the segments, at least I usually do.
|
 |
STEP 4. Glue the triangles to the segments. I
usually start by gluing a pair of segments and a triangle together,
sometimes with a rubber band around the assembly. After all the
pairs of segments are glued with their triangles I will continue gluing
pairs of segments to pairs of segments with another triangle.
If these instructions were helpful to you please let me
know. Thanks and good luck !!
|
If you have any
requests, please email me.
This page
and its source code is
Copyright 2026 by Kevin's Woodturnings
All rights reserved. World rights reserved.