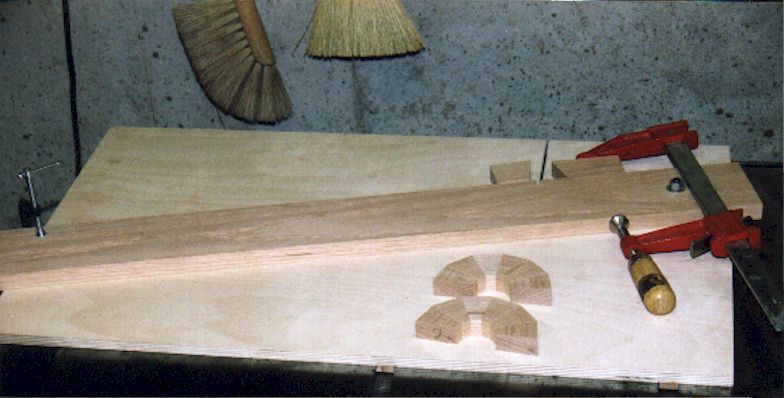
Fig.1 This is the 12-sided ring frame-miter sled. I have made two test pieces and have made the final angle adjustment to the fence. The next step is to make the fence angle non-adjustable.

Click on any photo to enlarge it.
|
Fig.1 This is the 12-sided ring frame-miter sled. I have made two test pieces and have made the final angle adjustment to the fence. The next step is to make the fence angle non-adjustable. |
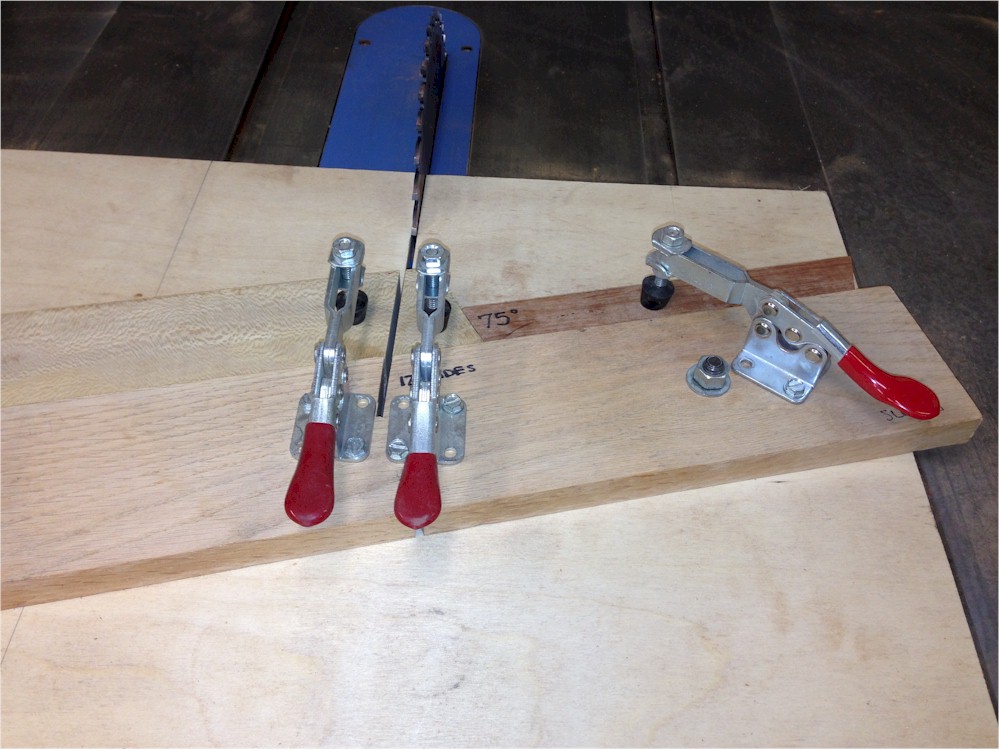 Hold-down clamps can be used to hold down the board, the cutoff segment, and the stop block. Hold-down clamps can be used to hold down the board, the cutoff segment, and the stop block. |
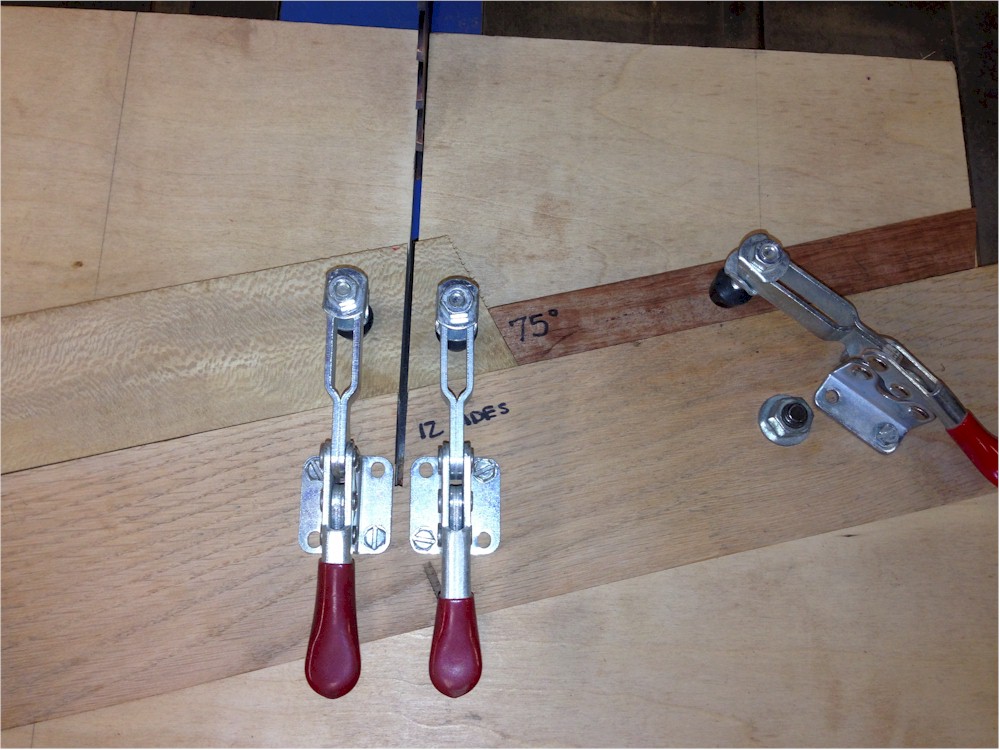 Hold-down clamp closeup. Thanks to Bud Schenke for the idea of using a hold-down for the stop block. Hold-down clamp closeup. Thanks to Bud Schenke for the idea of using a hold-down for the stop block. |
My sleds are made from 1/2" Baltic birch plywood. I like Baltic birch plywood because it's very strong, seems to be dimensionally stable, and stays flat. I make my fence and runners out of 1x4 oak or maple. You might note from the drawing Fig. 2, below, that my runners don't fit tight in the miter gauge slots. When I glue the runners to the sled, I hold the runners tight against the outside of the miter gauge slots. The sled assembly is supposed to fit tightly in the miter gauge slot but slide easily. But, if the sled is too tight in the slots I only have to sand the outside of one of the runners to adjust the sled fit looser. Conversely, if the fit is too loose, I only have to modify the outside of one of the runners, such as by gluing on a veneer strip or by applying thin coat of super-glue.
Fig. 2 |
Instructions for making a frame miter sled with a fence for 12-sided ring segments:
1. First we'll make the sled platform. Cut the sled from Baltic birch plywood 18" by 30". The 30" width dimension needs to be cut very accurately since this dimension is part of the angle calculation. The 18" dimension doesn't need to be exact.
2. Measure the width and depth of your table saw miter gauge groove. On my table saw, the miter gauge groove is 3/8" deep by 3/4" wide. Rip two 18" lengths of oak (or maple) runner sized to have 1/16" clearance with the width and depth of your table saw miter gauge groove. I made my runners 5/16" thick by 11/16" wide. See photo Fig. 3, below.
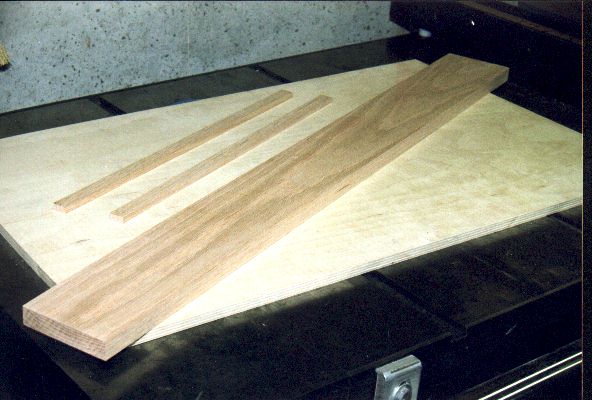
Fig. 3 Photo of the sled parts after Step #2. The sled platform, the runners and the fence have been cut out. |
3. Cut one of the runners into a 5" length and a 11" length . Both of these short runner pieces go on the right side of the sled and are separated by the pivot bolt.
4. Attach the right-hand runner pieces to the bottom of the sled, 2" (not a critical dimension) from the right-hand edge and parallel to the right-hand edge of the sled. The 5" runner length attaches even with the top edge of the sled. The 11" runner length attaches even with the bottom edge of the sled. I usually glue on the runner, then drive in a couple of brads for good measure.
5. Set the left-hand runner in the miter gauge groove, elevated by a couple of flat washers, so that the top of the runner is slightly above the top of the miter gauge groove. Apply some glue to the runner. Set the sled on the saw table with the sled's right-hand runner in it's miter gauge groove, tight against the right-hand side of the groove. At the same time, hold the left-hand runner tight against the left side of its miter gauge groove. See photo Fig. 4, below.
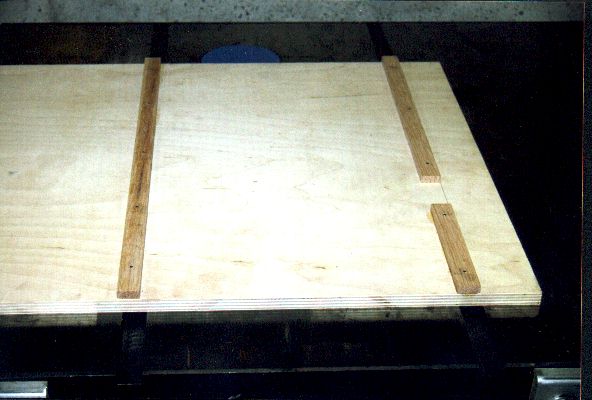
Fig. 4 Photo of the sled after Step#5. The right-hand runners have been cut to size. All runners have been attached to the sled. |
6. Allow the glue to set up on the left-hand runner. Then make sure that both sled runners are tight against the outside of their miter gauge grooves and that the sled has no side-to-side movement. If the sled is reasonably tight then remove the sled and drive a couple of brads into the left-hand runner to secure it. If the sled fit is too sloppy, then knock the left-hand runner loose and redo from Step #5. If the sled runner fit is a bit too tight, then sand the outside edge of either runner.
7. Now we'll install the sled's fence. Cut a 36" length (not a critical dimension) of flat 1x4 oak. Make sure one one of the 3/4" sides is very straight. If it isn't straight, rip it, joint it or whatever to get it straight.
8. Make a mark on the sled exactly 3" down from the upper right-hand corner. Make another mark on the sled exactly 11-1/32" (using the table, above, for a 12-sided ring) down from the upper left-hand corner. Refer to the sled design sketch Fig. 2, above.
9. Lay the 36" long 1x4 oak fence on the sled, with the straight edge oriented away from you. Line up and C-clamp the fence straight edge at the 3" and 11-1/32" marks. Lay out a hole for the 3/8" pivot bolt. Center the bolt hole in both the miter gauge groove and also centered in the width of the fence. The exact location of the drilled hole is not critical. Drill the hole and install the pivot bolt. Leave the left-hand end of the fence clamped so it can be adjusted. Later, the fence will be permanently attached to the sled. The fence is now at the correct angle (15 degrees). You can glue a strip of fine sandpaper the straight edge of the fence to prevent slippage of the boards you'll be cutting. You can also add hold-down clamps and other accessories to the sled at this point.
10. Put the sled on the table saw top and check its fit. If it fits OK then you're ready to make a test piece to check the sled's angle settings.
11. For the mathematically-inclined woodturners that want to build a custom sled, see the sled design drawing Fig. 5, below:
Fig. 5 To download an Excel spreadsheet that calculates frame miter sled dimensions as well as compound miter sled dimensions: click here. |
12. First we'll test squareness of the table saw blade. Unplug the table saw and raise the saw blade to its full height. Square the blade to the saw table as accurately as you can with a good square. Be sure that the table saw's blade insert isn't throwing off your readings. Plug in the table saw. As a recheck for blade squareness, using your miter gauge, cut the thickest board that your blade will cut (say, a 2x4 on edge, with the 4" side vertical). Check the cut squareness with your square. Turn the board over and recheck the cut squareness again from the other edge. Both square checks should agree. If they don't agree, your square is not square. Readjust saw blade squareness as necessary.
13. Now we'll set up for the test piece. Use a length of the 1x2 oak (or maple) to make the test piece. The test piece will consist of a half-ring of segments glued together. We could make a full-ring as a test piece, but a half-ring only takes half as long to make and it's just as accurate. Rip the test piece so its long side edges are parallel. This step is necessary for accurate repetitive frame miter segment cutting. Make sure that there's no excessive sawdust on the table saw top or in the miter gauge grooves. Raise the saw blade to its full height. Place your new frame miter sled in the table saw miter gauge grooves. Push the sled into the blade, cutting just into the fence. See photo Fig. 6, below. Place the 1x2 board against the sled fence so that about 4" will be cut off. This cut off piece will be used as the board stop block. Flip the 1x2 board over edge-to-edge (do NOT flip end-to-end) and align against the sled fence so that about 1-1/2" will be cut off. Butt the board stop block against the end of the 1x2 and clamp the board stop block into place. It's very important to use a board stop block so the segments will be cut exactly the same width.
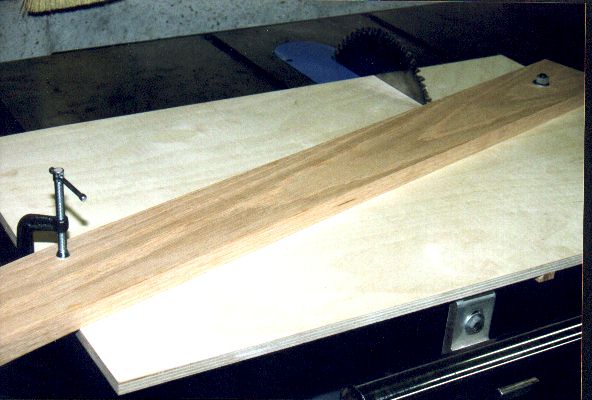
Fig. 6 The fence has been attached to the sled platform and a sawcut has been made in the sled fence. |
14. Next we'll cut the test piece. See photo Fig. 7, below. Make sure that there's no sawdust between the end of the 1x2 board and the board stop block. Butt the 1x2 board against the board stop. Hold the 1x2 board tight against the fence so it doesn't slip in either direction (the saw blade may tend to push the 1x2 board to the left as you cut). Cut off the first segment. Don't push fast. You'll get a better cut if you go a little slow. If you put hold-downs on your sled, install hold-downs for both the board and the cutoff segment. Cut six test segments. Remember, we're cutting six segments because we're cutting a half-ring of a 12-sided ring. If for some reason, any of the six segments are miscut, then cut another one to replace it.
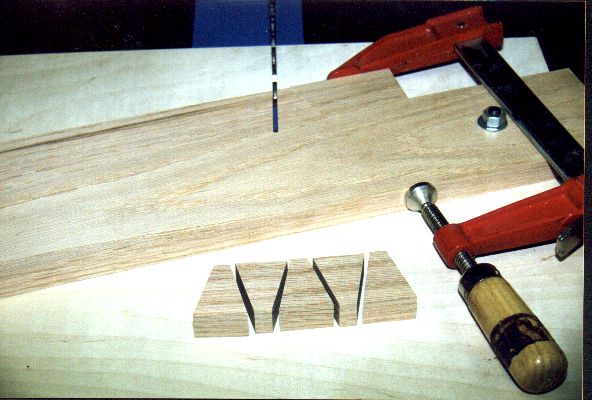
Fig. 7 The six test piece segments are being cut. Note the stop block and clamp. |
15. Lightly sand the six test segments, then glue them together. I use Titebond II glue, if you're interested. Since it's very difficult to clamp these odd-shaped segments together for gluing, I sometimes use rubber-bands. I rubber-band pairs together, then I rubber-band pairs of pairs together, etc. Most of the time I just spread glue on one segment, then rub two segments together at the glue line to distribute the glue, making sure the edges are flush and the glue joint is tight. I hold the segments together for a few seconds, then set them down carefully on a sink cutout. The glued pieces don't stick to a sink cutout. Sink cutouts are very cheap. Make sure the glue joint still looks tight. 15-minutes glue drying time for test pieces is usually sufficient.
When gluing up segments for your project, not a test piece, it's very important to use plenty of glue. Make sure there's no wood chips in the joint. Spread plenty of glue on the segment because end grain often needs a bit more glue than face grain. Some woodturners spread glue on both segments. Make sure the glue completely covers the glue joint surface. You should have some glue squeeze out. If you are using a wood that seems to really suck up the glue, use more glue.
16. Now, we'll inspect the first half-ring test piece and adjust the sled fence to cut perfect segments. Place the test piece on your saw table top with the cut edges down, like in photo Fig. 8, below. If the fence angle is perfectly adjusted, the entire cut edge should contact the table saw top. But, if the outside of the sawcut doesn't touch, like in my first test piece, rotate the left side of the fence toward you, maybe 1/16", like in photo Fig. 9, below. If, for example, the test piece didn't touch at the inside in the cut edge, we would have rotated the left side of the fence away from you. Continue to make fence angle adjustments and making test pieces until the test piece cut edges completely contact the table saw top, like in photo Fig. 10, below.
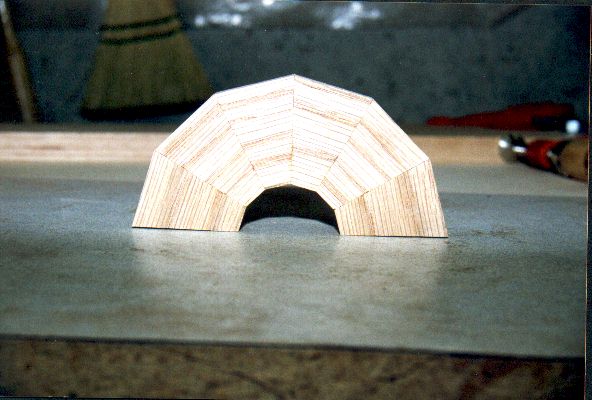
Fig. 8 This is the first test piece. Note the outside edges of the test piece do not touch the saw top, so the fence angle needs to be adjusted. |

Fig. 9 The left side of the fence has been rotated about 1/16" toward the front of the table saw. Now we'll make a second test piece. |
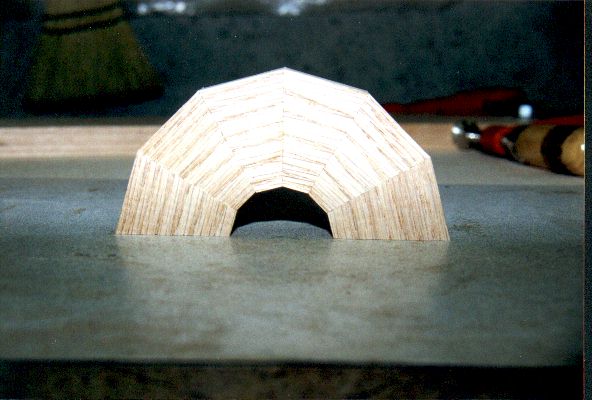
Fig. 10 This is the second test piece. Note that the cut edges of the test piece completely contact the table saw top. No more fence adjustments are necessary. |
17. When the fence angle has been final-adjusted, I mark a pencil line on the sled, along the edge of the fence so I can tell if the fence has moved. Then I attach the left side of the fence to the sled using a wood screw. Mark the sled fence "12-sided ring segments". That's it! The sled is finished.
Instructions for making a frame miter sled fence for 8-sided ring segments:
1. Similar to Step 7, above. Cut a 36" length (not a critical dimension) of flat 1x4 oak. Make sure one one of the 3/4" sides is very straight. If it isn't straight, rip it, joint it or whatever to get it straight.
2. Similar to Step 8, above. Make a mark on the sled exactly 3" down from the upper right-hand corner. Make another mark on the sled exactly 15-7/16" (using the table, above, for an 8-sided ring) down from the upper left-hand corner. Refer to the sled design sketch Fig. 2, above.
3. Similar to Step 9, above. Lay the 36" long 1x4 oak fence on the sled, with the straight edge oriented away from you. Line up and c-clamp the fence straight edge at the 3" and 15-7/16" marks. Turn the sled over and, using the 3/8" pivot bolt hole as a guide, drill a 3/8" hole through the new fence. The fence is now at the correct angle (22.5 degrees). You can glue a strip of fine sandpaper the straight edge of the fence to prevent slippage of the boards you'll be cutting. You can also add hold-down clamps and other accessories to the sled at this point.
4. Continue with Step 10 above, through Step 17 above. Mark the new fence "8-sided ring segments".
Good luck.
This page and its source
code is
Copyright 2026 by Kevin's Woodturnings
All rights reserved. World rights reserved.